


Lighting speed with Buddy Works Pipelines
A quick real world scenario to get started working with Buddy Works pipelines.


A month ago I got introduced to a Buddy tool for a new work I started doing for a company. Coming from a background of different CD/CD tools in past including Jenkins, TeamCity and Github Actions. Buddy seems pretty new to me.
The requirement for a company was for me to quickly pickup existing projects and pipelines in short amount of time. I though this would be yet another tool that I will have to learn to get better understanding of current projects and build workflows.
All it took me was 30 mins quick walkthrough guide of buddy to understand how it works. Buddy has really great documentation along with visual steps to help you relate it with their tool. it's basically for anyone including Developer to a DevOps Engineer to understand how to get started with Buddy.
I have quickly started using Buddy for new project that was just starting up. It had a pretty complex requirement. Where we were going to have Acquia Drupal website rebuild. The Development and Production environment were being used for current live site. We were give access to Staging Acquia environment to repurpose it for development/uat purpose. On our end we were using GitLab along with Buddy to deploy changes.
We defined a workflow that utilizes restrictions on host environments as below.
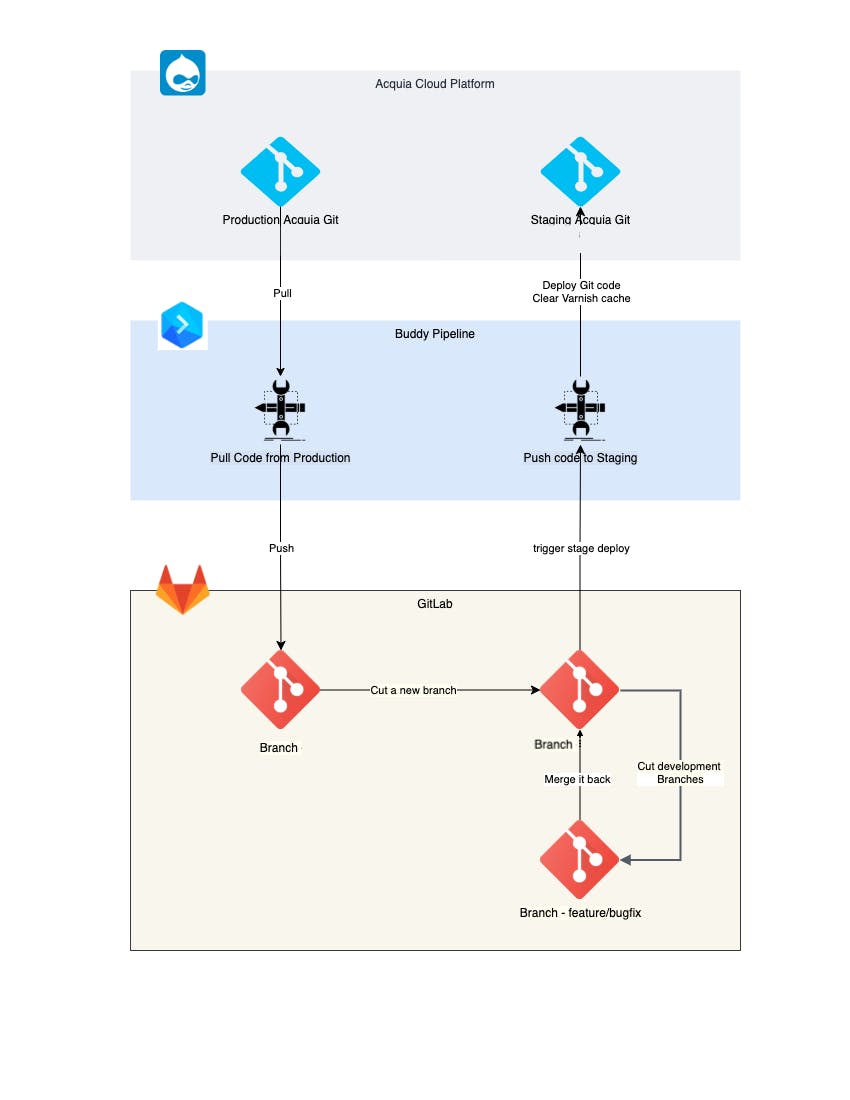
Now that work flow was clear, most of our heavy lifting was going to be done by Buddy pipeline.
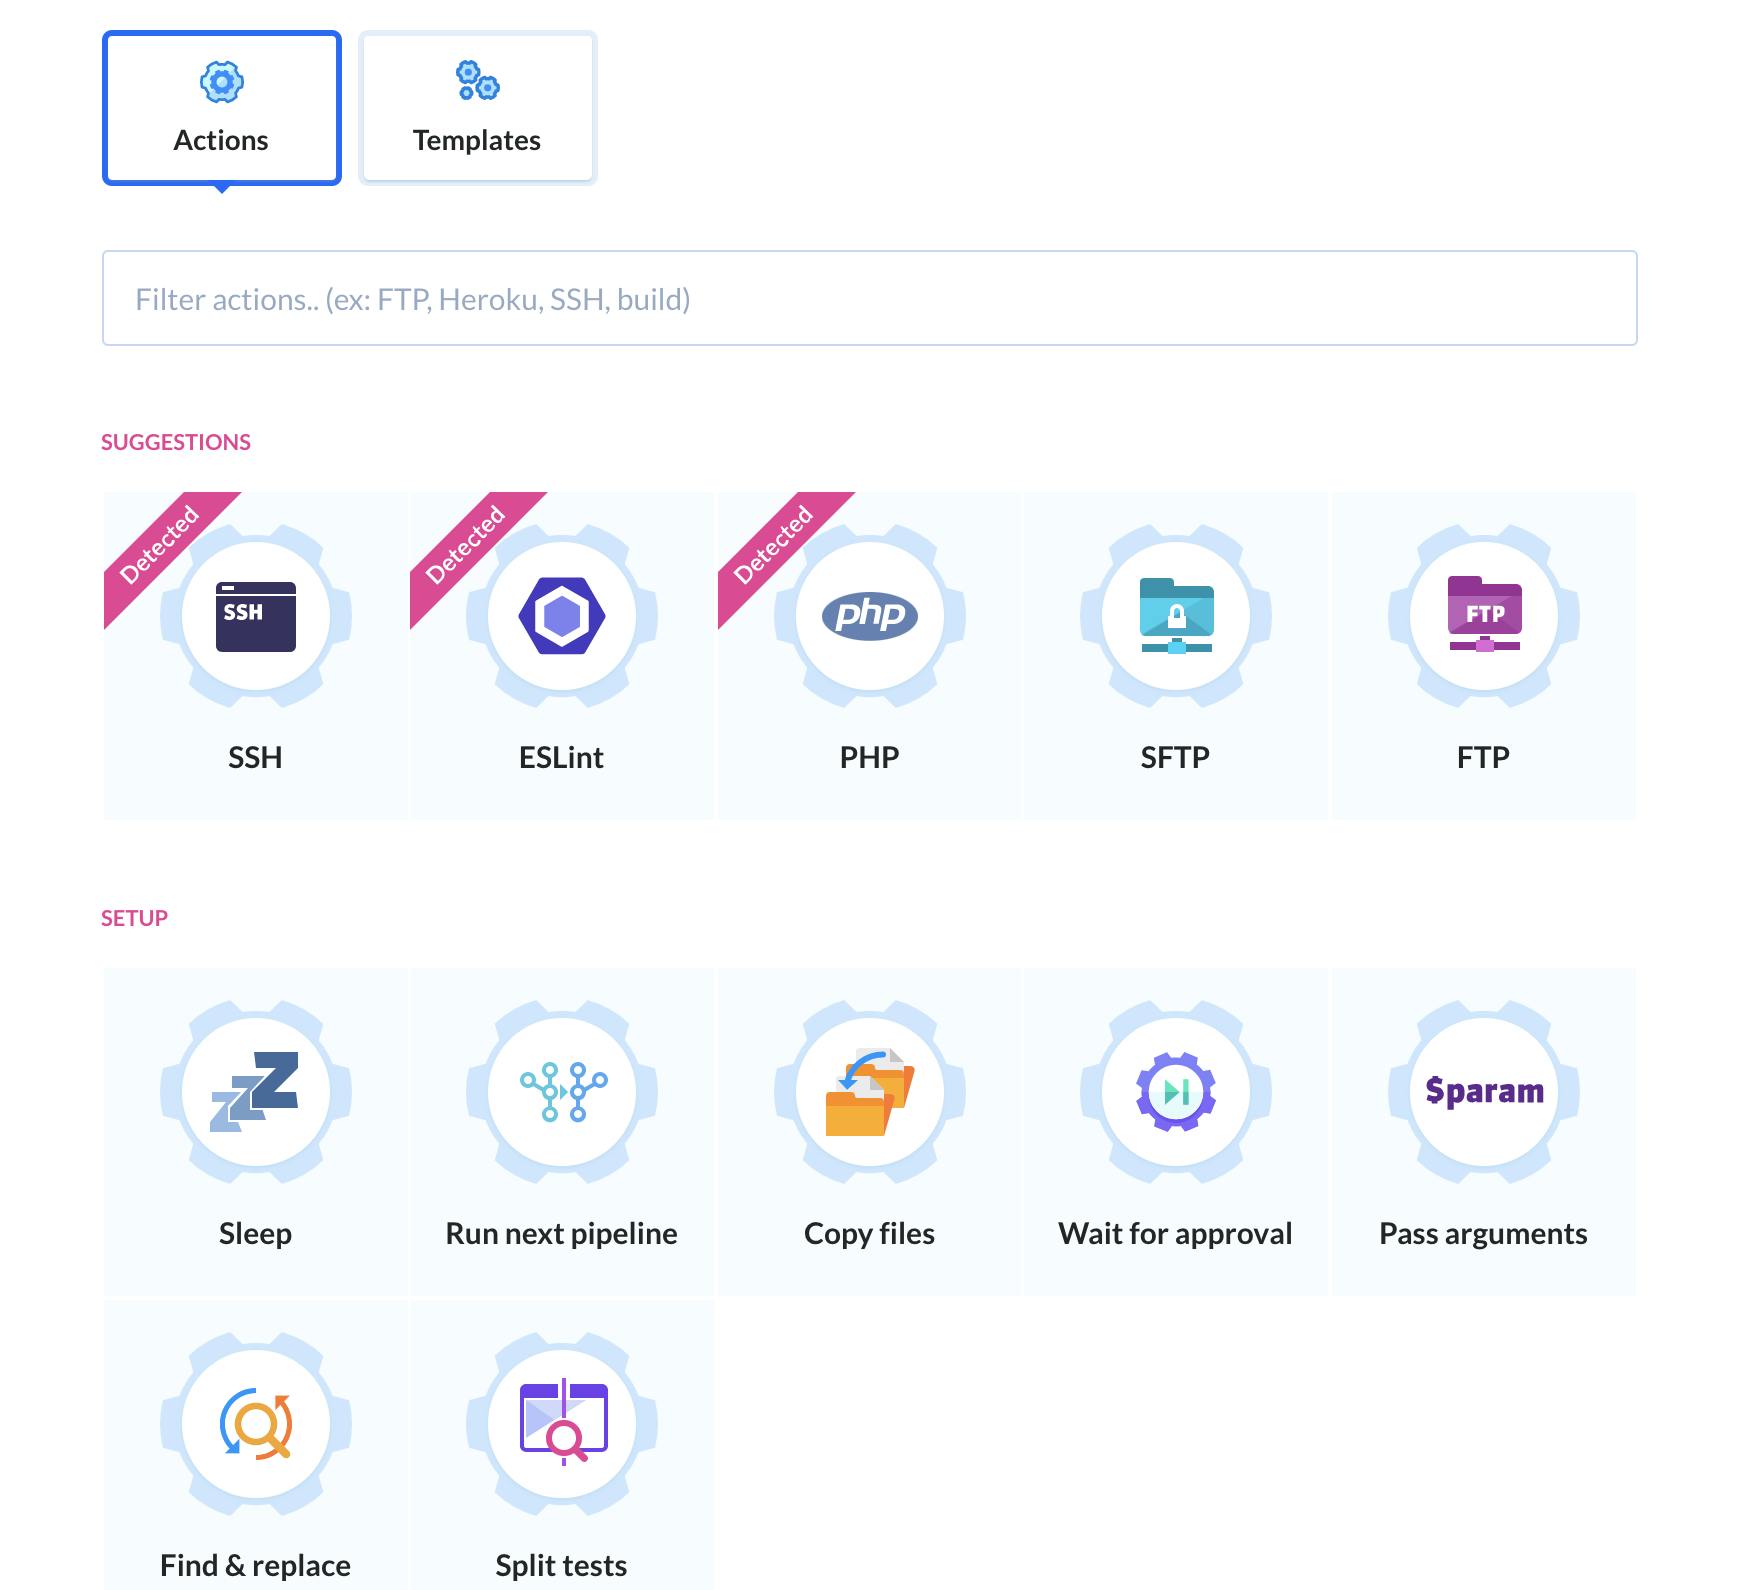
Great thing about buddy is you can define actions by using huge list of widely used integrations that Buddy already provides. The main issue with other tools are you have to micro manage each aspect of these integrations including SFTP, Slack, AWS and other integrations. See below some of the integrations provided by Buddy
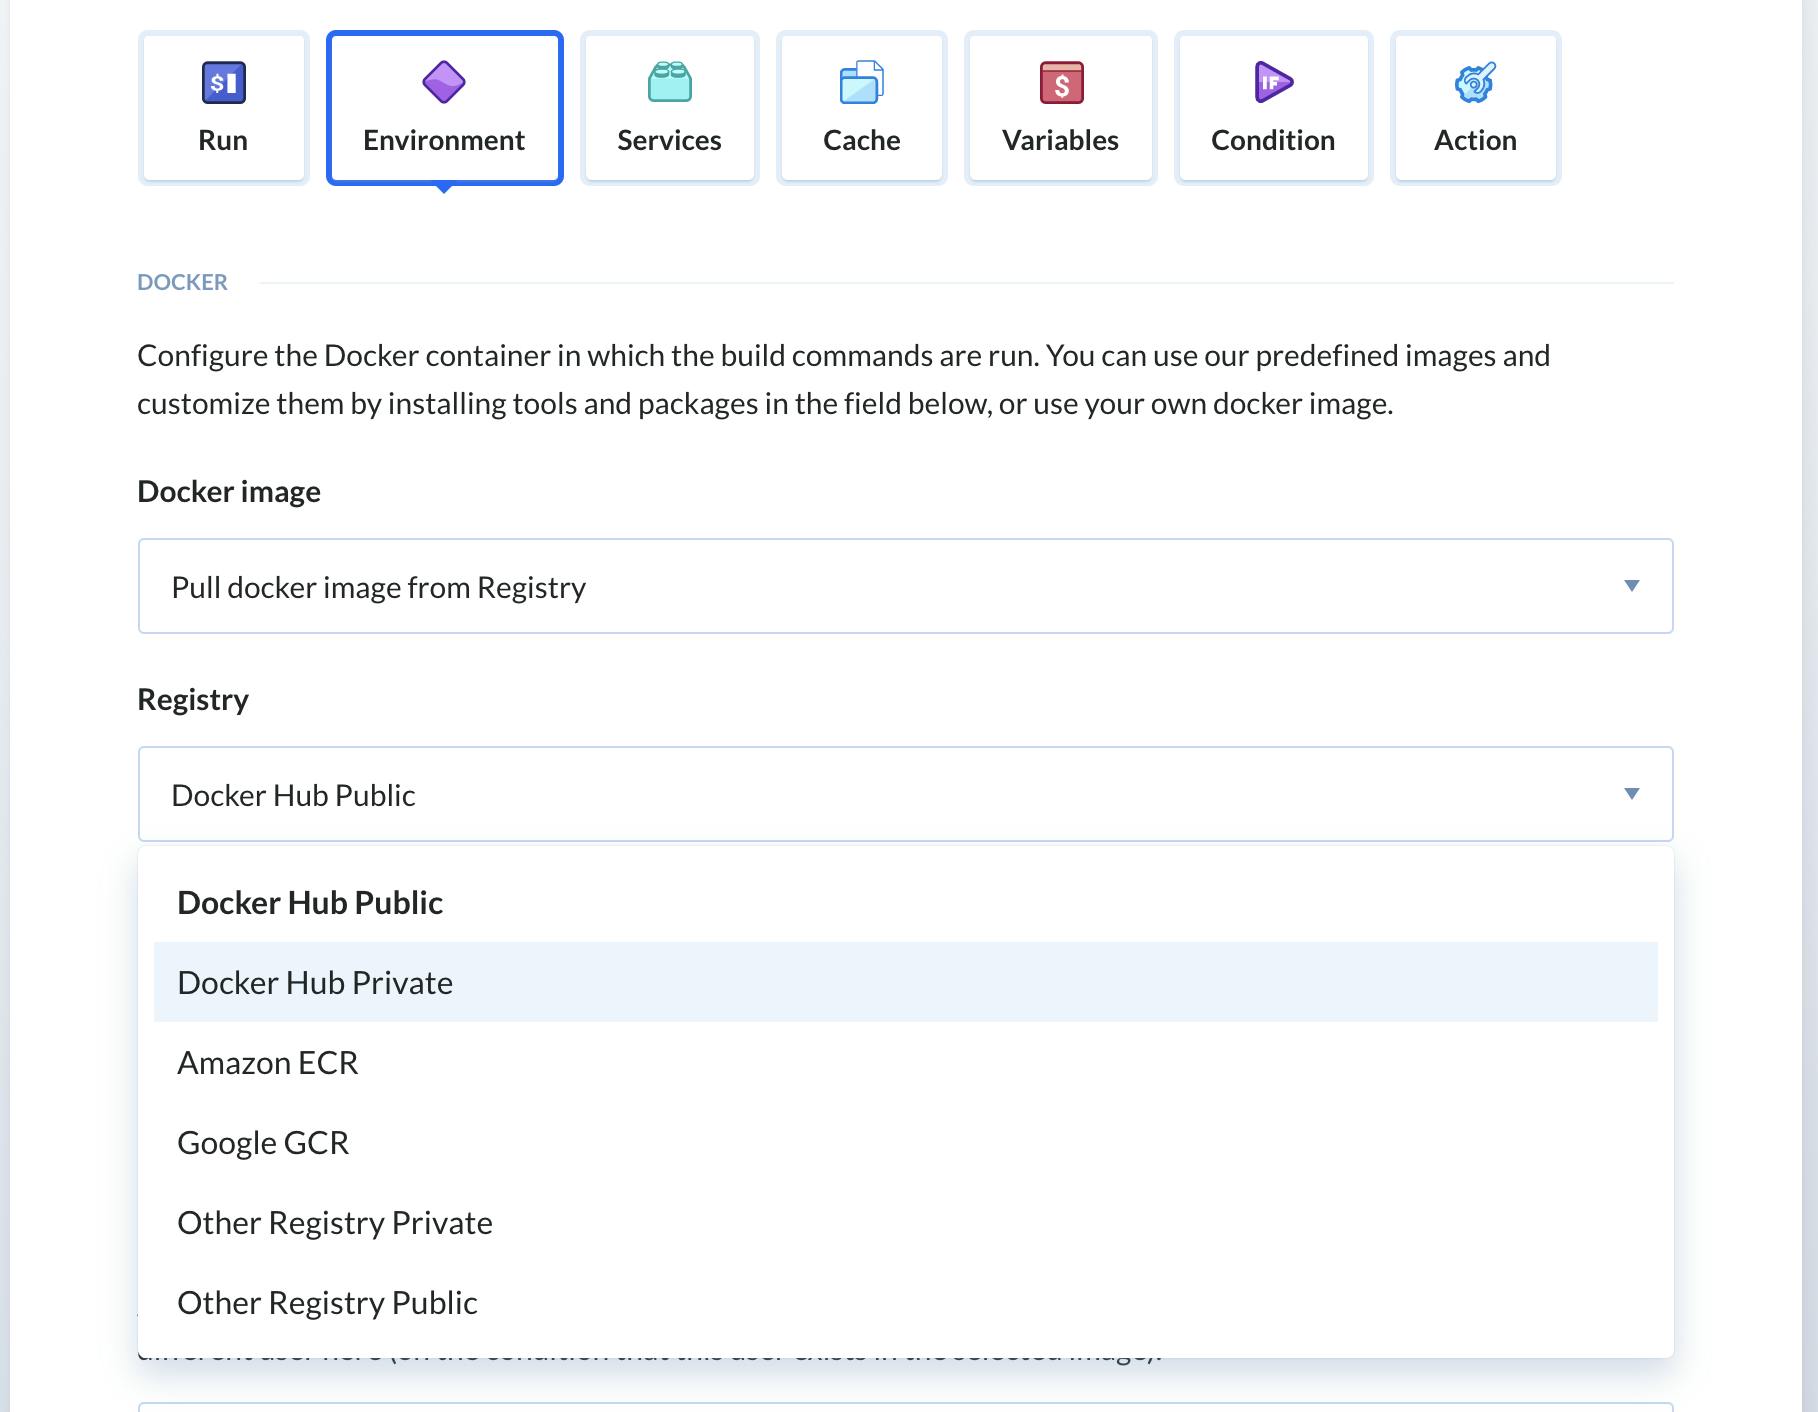
Best thing about Buddy that I realized when I started using was, on each step you can define customized environments using Docker images. This image can be a standard public image or your own customized image either from Docker Hub Public/Private, AWS ECR, Google GCR or other registries.
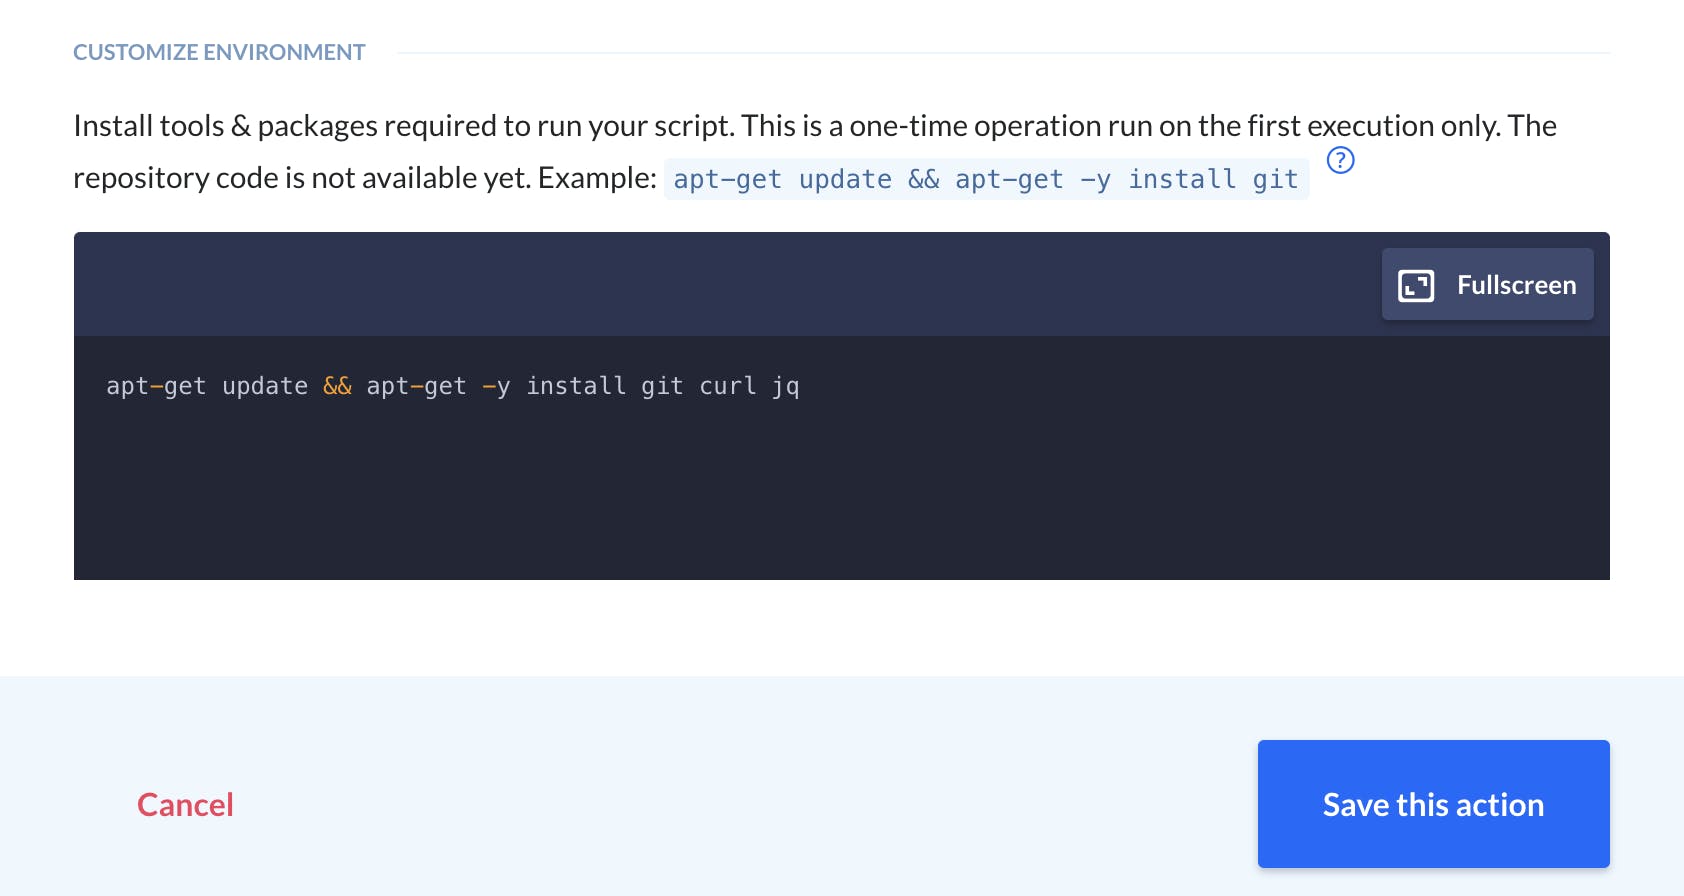
On top of that you get the ability to customize docker environment that prepares your docker environment before the actual logic gets implemented. See below.
Once the environment was ready, the main logic implemented using Bash script that performed bunch of commands to push code from GitLab project branch to Acquia git branch.
echo "Add ssh-key for Acquia to known hosts"
ssh-keyscan xxxxxxx.hosting.acquia.com >> /root/.ssh/known_hosts
ssh-keyscan gitlab.com >> /root/.ssh/known_hosts
if ! git remote | grep acquia > /dev/null; then
  echo "Setting up origin to Acquia"
  git remote add acquia <user>@xxxxxx.hosting.acquia.com:<acquiaproject>.git
fi
git remote -v
git fetch acquia
git push acquia +<masterbranch>
Once the code has been pushed to Acquia git branch, Acuqia tries to deploy updated code internally.
Next I added another step in Buddy pipeline to clear varnish cache for Acquia changes to take effect.
sleep 30
TOKEN=$(curl --data-urlencode "client_id=${CLIENT_ID}" --data-urlencode "client_secret=${CLIENT_SECRET}" --data-urlencode 'grant_type=client_credentials' -X POST 'https://accounts.acquia.com/api/auth/oauth/token' | jq -r '.access_token')
curl -X POST https:\/\/cloud.acquia.com\/api\/environments\/${ENVIRONMENTID}\/domains\/${DOMAIN}\/actions/clear-caches -H "Accept: application/json" -H "Authorization: Bearer ${TOKEN}"
In above steps, I'm calling Acuqia API 2.0 which uses OAuth2 to generate token every-time a request is made to clear cache.
You might also notice ${xxxx} in above code block. You can define environemtn variables easily in Buddy either at Build level or each step level. This gives you flexibility to micro manage variables and inject them at a run time in build steps.
Once, cache clear was complete, we needed to notify team that a deploy has been made and they can start test the endpoint. For that we used slack build step option provided by Buddy. All you have to do is add slack integration using you user which has access to slack channel that you want to send notification.
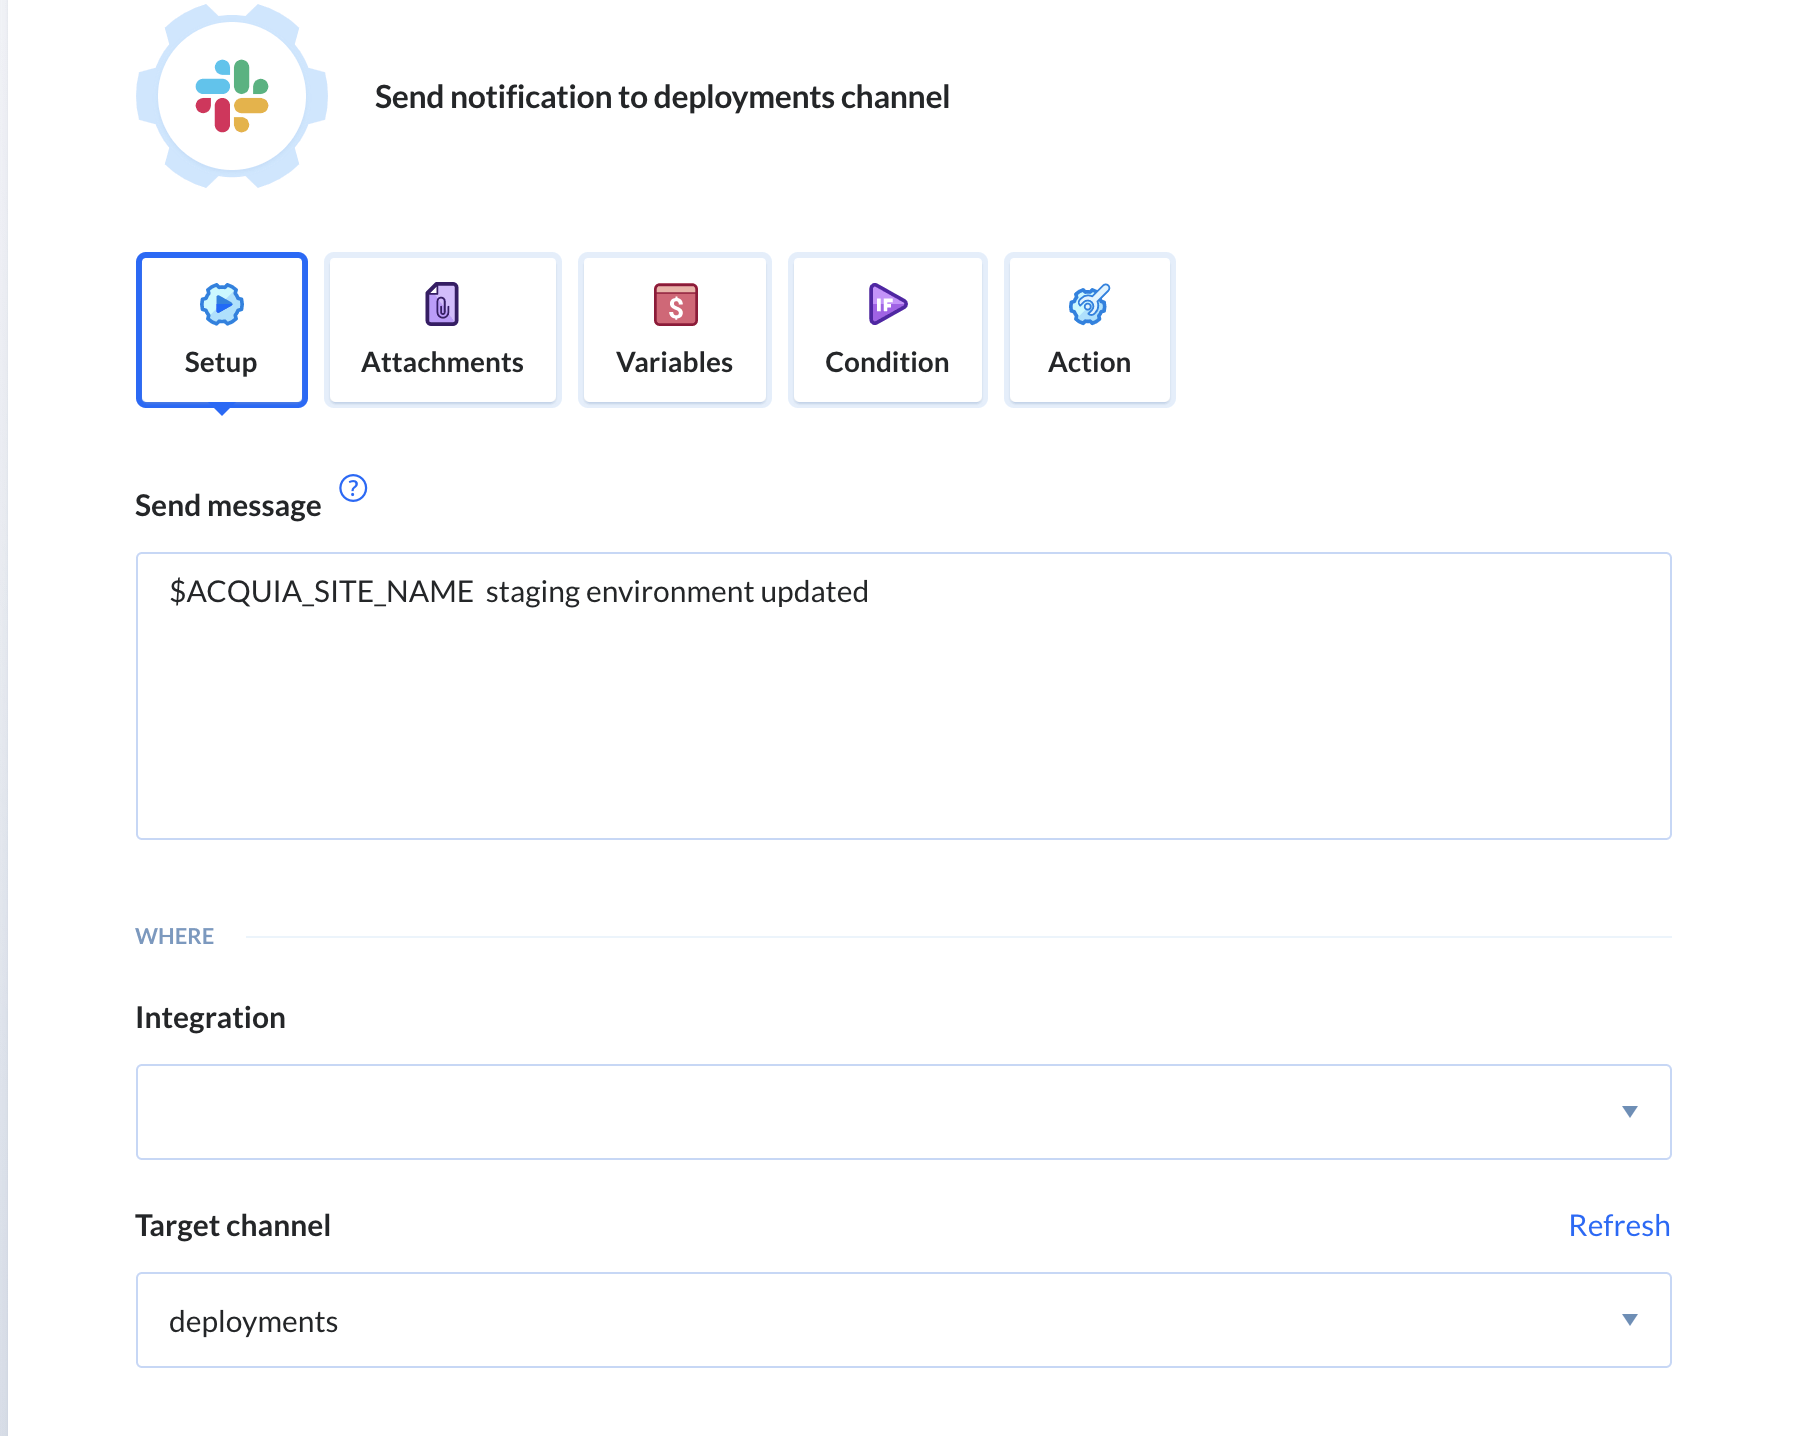
You can also customize notification message using Content Blocks in Slack integration. Once defined you can Test Action to verify your notification works.
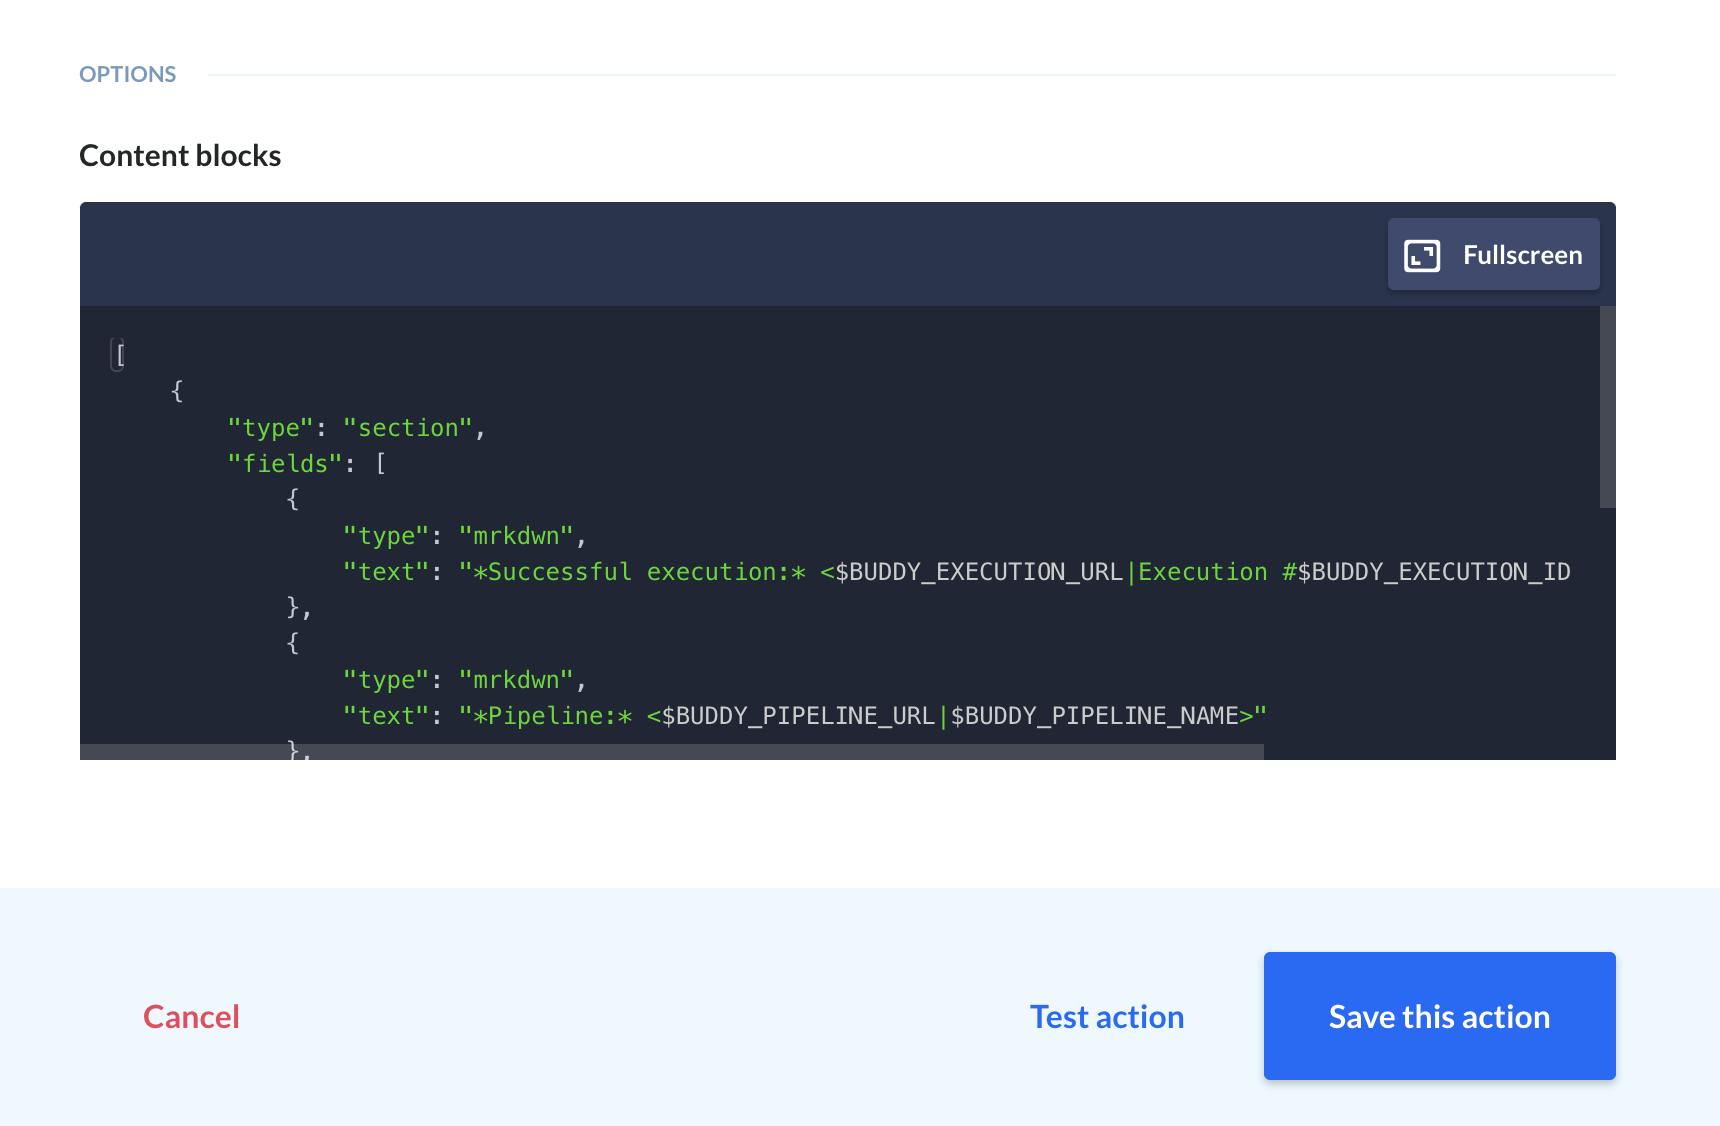
You can define notification for both success and failure scenario.
This pipeline was pretty simple and I have taken this for reference so that people who wants to start with Buddy can quickly get started with this kind of build pipelines without needing to invest time in learning everything about tool like Jenkins or Circle CI and get it up and running in no time.
Buddy has so many options to customize build and to optimize performance by selecting if you want to run entire build or just one step that failed. Even it allows you to select if it should use cached copy and just pull changes to run the build. Ideally this saves a lot of time and provides quick turn around time for day-to-day build deploys.
Also, I noticed you have really easy access to Buddy support via chat and email option. I really liked the chat option as it's easy to use and well as pretty quick to get your questions answered by professionals.
#HappyBuddying #BuddyGit